A few useful knots
suitable for kite flying
- Notes
- Strength of knotted lines
- Swivel clips
- Working knots up tight
- Tying line to reels
- Knots for joining lines
- Blood Knot
- Double Grinner / Back-to-Back Uni Knot
- Knots for High-Tech Super-Braids
- Palomar Knot
- Berkley Braid Knot
- Half Blood Knot Variation
- Knots for attaching swivel clips
- Loops
- Double Overhand Loop - easy
- Perfection Loop / Angler's Loop
- Hitches
- Jansik Special
- Palomar Knot
- Hook Tie
- Tucked Half Blood Knot
- Berkley Braid Knot - for high-tech super-braids
- Grinner / Uni Knot / Duncan Loop
- Anchor Bend - good for very heavy line
- Hangman's Knot (Jack Ketch's Collar)
- Non-weakening loops on flying line
- Blood Dropper Loop
- Double Grinner loop idea
- Prusik Knot
- Clove Hitch
- Specialty Knot
-
- Falconer's Knot
Notes
Strength of Knotted Lines
Stated breaking strains of lines from different manufacturers often don't compare well in practice. Furthermore, different lines show differing degrees of strength reduction at knots. Follow this link for a comparison test of sample 20lb braids.
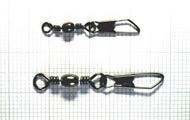 One of the first things the old dads at the Round Pond told us was never to use swivel clips without an extra locking ability of some sort. Those with just straight wire sides (right) would inevitably pull undone in a gust. Since then I've seen this happen (Murphy's Law again).
Here are some typical "proper" locking swivel clips:
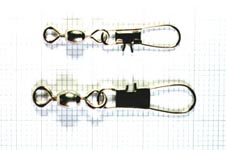

Note the extra bends in the wire that secure the clips when shut.
Although braided line doesn't have the same tendency to twist as twisted line, and regular swivels don't rotate under tension (spinning only when the tension relaxes), I still prefer and recommend using swivels. They can be seen spinning (a lot) when kites are brought in, even on braided lines, especially if the line's being wound on to a spool by hand, where it gets twisted with every turn.
Since swivels are meant for use in water with the water providing lubrication, some kite flyers think swivels running in air will wear out relatively quickly. True, good quality swivels are generally smooth-spinning, but since they spin only when there's no tension, wear is minimal - most of our old swivels are still going strong. Big, chunky clips are not too difficult to open and shut, with or without gloves, and big, strong swivels seem to last forever like Victorian engineering (above left).
For maximum light wind performance, though, we combine high quality small swivels with separate large, manageable clips (click the link to see snaps with both lightweight and chunky swivels in the Line & Winders Catalog).
Tightening knots - A poorly tied knot is a weak knot
The steps in working a knot up tight are:
- Know what the finished knot looks like (if at all possible)
- Encourage newly tied knots in the direction of the finished form by patient pushing
- Tighten knots by gradually removing slack from each part in turn, a little at a time
- Never distort the knot beyond recognition by just tugging on both ends. Very few knots can be tightened by pulling the two ends. Each part emerging from the knot should be gently pulled in turn to ensure the knot settles down evenly
- Knotted rope or cord knows which way it wants to lie - you can't force it to do differently
- A little spit can be a great help
The simplest method is to use a Round Turn and Two Half Hitches (plus a stopper knot) or a simple Overhand Noose (also with a stopper knot). A "round turn" is just looping the line around the hub twice. I sometimes do the two turns as a Clove Hitch. Start with a running loop twice the size you need and at some point flick the single loop into two smaller loops to form the Clove Hitch.
Note that once on the reel, the running knot, when winding line onto reels, will automatically either loosen itself or snug up tight. I prefer the latter. Which way you end up with depends on which way you naturally reel your line in.
Deep sky reels
Some people wind their reels opposite to the way I do; hence it's a case of trial and error here. Whichever way you prefer to wind in, the trick is to loop the line over the hub of the drum so it draws the noose up tight as you wind in. If the loops around the hub loosen as you wind, they'll just slip; around the other way (the right way), the noose will tighten up and grip the hub of the reel as you start to wind.
I line the hubs with carpet tape first so there's a better grip.
The best knot bar none for joining two lines together
Quick and easy to tie, Blood Knots draw up snug and small, forming a smooth barrel shape that won't catch, snag or otherwise interfere with smooth reeling.
Tackle makers in the 19th century kept how these knots were tied a trade secret. They'd make you as many as you wanted, anytime, but you had to pay them.... until an engineer aboard a White Star liner named Jock Purvis ingeniously reconstructed a specimen knot with cut sections in paraffin wax, which he analyzed using a microscope. He then passed his discovery on to an angling author, who told the world in a 1910 publication.
My technique for tying them is to keep the knot a bit loose while pulling both standing parts, alternating with gentle pulls on the two ends. Pulling the main line tightens the ends of the knot, while pulling the two ends apart tightens the middle part - you want them equally tight. (If a helper holds the two ends just taut, you can do one with a single smart tug.)
Watch that the coils form without riding up over each other. If one does, straighten it out while it's still loose, or cut it out and start again.
Finish with a good tug. It's my most-used knot. Whenever and wherever fraying is discovered on a line, that section must be cut out and re-joined immediately using a Blood Knot.
| Trim the excess to about 3/16 of an inch, and melt the ends (without setting them alight) just up to the knot. This goes for all the knots here. |
|---|
Recommended by knowledgeable customers, the Double Grinner is used by anglers for bringing in large fish on light line. Fishing line manufacturers recommend it for joining braid to monofilament. It's also useful for joining lines of different thickness. For instance, for tying kite line to a short length of thicker, stronger braid tied to the hub of a reel, or for tying a swivel to at the other end.
The knot consists of two Uni/Grinner Knots tied one-at-a-time (see below - click picture to return here). Tie the first with one line around the end of the other line, and snug it up, but not fully tight. Tie the second one around the first line, and tighten it finger tight. Slide the two knots together, and tighten them both further, pulling hard.
Click here to see better pictures and a good little video at www.netknots.com
A short length of line with a Grinner Knot at at each end could be tied to a main line to form a loop. A Blood Dropper Loop is probably about 80-90% efficient, but it seems to me this pair of Grinner Knots idea wouldn't weaken the line at all (unlike fishing lines, kite lines are almost always under tension, and they usually break at stress concentrations like nicks, frays, or knots, so anything that weakens line is to be avoided).
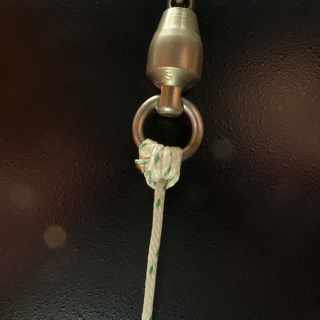
Loops are the easiest way to attach as well as remove swivels to almost any kind of line
Loops are easy, and attaching swivels with a Cow Hitch, or Lark's Head Hitch as it's known in the UK, is even easier. I tend to avoid them as a rule, because breaking strengths for loops are rarely, if ever, specified. It's difficult to recommend their use in spite of the fact that a few experienced kite flyers have been using them for years. I have acquired old reels with loops made simply using two Overhand Knots (the simplest knot there is) about two inches apart, leaving a roughly two inch loop, and they had been in use for over 30 years. The Double Overhand Loop is the strongest loop I know of, followed closely by the venerable Perfection Loop. The Figure of Eight Loop may be reliably strong and secure, but no breaking strain has been found. A photo of one on a swivel attached with a Lark's Head Hitch is shown here.
 Figure of Eight Loop with a swivel attached using a Cow HitchThe Round Pond kite flyer mentioned above would make a much longer loop and add an Overhand Knot halfway between the Figure of Eight Knot and the swivel.
Tying the loop on a short length of heavy line used as a leader cancels out any theoretical weakness in the loop and Cow Hitch combination, but the problem then becomes tying the line to the leader without introducing a weak spot. A Sheet Bend is one answer.
The well-known Bowline is easy to tie and commonly used for jobs of all sorts including lifesaving, but it only has a breaking strength rating of 60%, which means it can not really be recommended for kite lines. It is best to avoid using any knot until you know for certain that it has an adequate breaking strain. And always be careful not to let any part of a knot get criss-crossed as it's snugged up tight.
Neat, durable, and very easy to tie
This knot forms a loop to which swivels can be quickly attached and removed with a Cow Hitch (Lark's Head Hitch in UK).
Tying is self-evident. (The precise efficiency rating for this one came from a German magazine.) It's just a simple Overhand Knot done twice, but it works up tight. Attach swivels with a Cow Hitch, or Larkshead Hitch (thread the loop through the eye, then feed the swivel through the loop).

Perfection Loop efficiency: perhaps about 85%
There are classic angling knots for which the breaking strain may not be known, but that may have been used successfully all one's life. For example, the Perfection Loop (or Angler's Loop) has been in use since the 1870s and may well be excellent for kites, but until recently its breaking strain was unknown to me. (It's rumored to be about 85%).
Nevertheless, it's doubtful it would have stood the test of time if it wasn't a good knot. It's nice looking and it doesn't twist around as it's worked tight.
Proper strong knots for attaching line to swivels, starting with my two favorites, both of which have at least two turns around the eye of the swivel
A personal favorite for quite a few years

This knot is said to be so beautifully simple it can be tied in the dark, but I tie them with care. Of course I'm not sure if mine are tied right, but they look OK to me, and I use them on most of my own swivels. Until now I've always tied them as per the verbal instructions below (no illustration) from one of my knot books. I tie them with very small loops, keeping them in order, so there aren't any cross-overs. I think that doubling one up and/or adding more wraps would make them very hard to snug up neatly, which may be why they're not mentioned for use with Superbraids, but I think it's worth a try at least.
The following drawings are based on the first pictures of this knot I've seen, which appeared flawed; I've re-drawn them the way I think they are supposed to be done, and test-tied a few for confirmation. They end up looking like the one in the photo at right. It's been a reliable knot for me. The web link below says it is for very light lines, but I have used it on line up to about 400lb bs, by carefully keeping the three loops as small as possible - leaving just enough room to get the final three wraps through - and in order. Over many years it has been my favorite knot, but lately I have been trying several others, including the Grinner/Uni Knot for medium strength dacron polyester, the Palomar for superbraids, and the Hook Tie for thin dacron.
Front and back views of my interpretation of the Jansik Special are shown in the two photos at right (here and below), on 125lb un-waxed dacron.
The 25+ year old line has been cleaned up recently, so the knot hasn't been set hard by work yet.
1. Thread about 6 inches (15cm) through the eye of the swivel; bring it around in a circle and pass it through again, forming a loop.
2. Feed the loose (or working) end through the eye again to form two parallel loops.

3. Cross the working end over the standing part (the line opposite the working end).
This will form a third circle.
4. Now, holding the three circles together, wrap the loose end around them three times.
(At this point I tidy things up by snugging up the three big initial loops through the eye, leaving them just loose enough to allow the loops just made to tighten at the next step.)
5. Tighten: hold the swivel in one hand, the standing part with the other, and the loose end with your teeth, and tighten by working the loops bit by bit. Finish with a hard, steady pull on both ends.
Tip: I don't know what these are supposed to look like. I prefer neat-looking knots, so I tend to take care to keep the coils in order as I go. Holding the first three in a tight coil, I start the next phase at the last loop, and work my way back to the first, all the while making sure that none cross. I draw the three main loops up quite small and do the three final wraps just loose enough to allow working the loops tight, always on the lookout for any crossed coils. The alternative leads to chaos, but on reading how some people tie these, maybe that's the whole point of this knot—it doesn't matter.
Remember Tip 6, above.
The original instructions from one of my old knot books
 ref: Knots & Splices, A Comprehensive Guide to Ropes and Lines, by Charles Gibson; Granada Publishing, 1961, 1979, p.125.
1. Thread through the eye.
2. Take the loose end twice more through the eye to make two parallel loops.
3. Take the loose end round the standing part and through both loops three times.
4. To tighten: hold the hook with pliers, the standing part with the other hand and the loose end with your teeth before tightening with a steady pull on all parts.
At right is a picture of my interpretation of those instructions, showing the back. To be honest, I found these easier to tie, and to learn to tie, by following the text on its own without the pictures.
Click here to see other pictures and an animation of the knot being tied at www.netknots.com
Go back to 1st paragraph of Jansik Special
(Also known as the Overhand Loop)
This is said to be the best knot to use on braided lines. It is the only knot shown on the inside of the packaging for the 80lb TUF-Line XP (Western Filament)—which I have on one of my reels.
Be sure that when the swivel is passed through the loop that all parts of the knot cinch up together. Many depictions of this knot elsewhere make it look like the loop part of the knot goes up against the bottom of the eye of the swivel. The knot can fail if tied in that manner. -netknots
Properly tied, this knot is as pretty as it is strong. The Eagles Park website (Missouri, USA) says: "The Palomar Knot is (a) very simple knot... regarded by the International Game Fish Association consistently as the strongest knot known. It's great virtue is that it can safely be tied at night with a minimum of practice."
The finished knot belies its simplicity - though it looks complicated, it's easy to tie on most lines. One exception might be on waxed line, where it can be difficult to get the loops to snug up evenly. (Remember Tip 6, above.)
 |
 |
| 1. Double the end of the line, and thread it through the eye of the swivel. |
2. Tie an Overhand Knot with the threaded loop and the standing part as shown. |
 |
 |
| 3. Put the snap swivel through the loop. |
4. Holding the swivel in one hand, slowly pull both ends of the line to tighten the Overhand Knot, taking care to avoid twists. Don't tighten the Overhand Knot all the way just yet. The loop will probably want to catch at the eye, as shown. Help the loop over the eye, so it can jam against the knot as it tightens. |
Click here to see more instructions plus an animation of the knot tying process at www.netknots.com
 |
<<< The finished Palomar Knot doesn't appear to be based on a simple Overhand Knot...until you turn it over >>> |
 |
Hook Tie efficiency: 95%
The finished Hook Tie is an elegant, symmetrical knot said to be ideal for thin and/or sleeved high-tech lines (Kevlar, etc.). I've used it on very light (15-20lb) line and on sleeved 50lb Kevlar bowstring.
 Also known as Improved Half Blood Knot and Improved Clinch Knot
This is a useful knot for thin lines. It's easy to tie, reliable, and looks good. Sources recommend doubling thin line. The extra tuck is regarded as an option, but efficiency drops to as low as 80% without it.
- Thread the line through the eye.
- Take five turns around the standing part.
- Dip the loose end through the loop between the eye and the first twist.
- Pass the end through the loop formed by the loose end and the twisted part.
- Pull on the end to tighten.
Variation for High-Tech Lines a.k.a. "Super-Braids"
- Double very thin line into a bight.
- Thread through the eye preferably two times.*
- Use 5 or more turns around the standing part.
- Don't add the extra tuck. Trim off the tag ends, or leave a loop for attaching things.
*On some lines two turns through the eye might make the knot difficult to snug up.
Click here for better pictures, plus an animation of the knot being tied at www.netknots.com
This knot was developed by Berkley prior to 2004 specifically for the new braids.
| The Berkley Braid Knot has been extensively tested by the Berkley Research and Development staff. It is also shown in Western Filament's Braided Dacron (standard dacron, not TUF-Line superbraid) packaging. |
 |
1. Double up the line to form a longish loop and pull it about half way through the eye of the swivel. Double it back parallel to the standing line and tag end, and hold the four lines together a few inches behind the eye of the swivel. |
 |
2. Wrap the loop around the four lines 8 times in either direction, working back toward the eye. After eight wraps poke the end of the loop through the opening behind the eye. |
 |
3. Tighten the knot with a steady and even motion, and possibly some spit. Cut off the loop by the eye and trim the tag end.
|
 Strong and easy to tie
The trick to tying this one on any type of line is to snug it up just enough to allow it to slide, and no more, before sliding the knot up to the swivel to tighten. It even works on waxed line.
1. Thread through the eye. Fold back 8 inches of loose end. Refold about 5 inches of this towards the eye to form a second loop. Take the loose end five times around both parts of the first loop but passing always inside the second loop (in the direction away from the eye).
2. Pull on the loose end, tightening the knot, but not completely, so it can slide. Then slide the knot to where it is wanted and tighten further, pulling hard.
Once tight, it literally grips the line and won't slide. In fact "Gripper" wouldn't be a bad name for it.
Recommended by a sport fisherman and falconer, who said it's the strongest knot you could use.
Click here for an animation of the knot being tied at www.netknots.com
| To join two high-tech lines of different thickness tie the thick line around the thin one with a Uni Knot, and tie the thin line around the thick one with a Tucked Half Blood Knot, using a few more turns than were used on the Uni Knot. |
For attaching big clips to thick, heavy line
Some books show this knot as a "Fisherman's Bend," sometimes without the second Half Hitch. Whatever it's called, it's a Round Turn and Two Half Hitches (also used for anchors) with the first Half Hitch passed through the Round Turn in step 2.
On my heaviest line there is an Anchor Bend on the end of an even heavier leader and no swivel - just a medium sized carabiner. The other end is tied to the main flying line with a Double Sheet Bend.
Permanent loops on kite line without serious weakening
 1. Loop the line |
 2. Twist the two standing parts together about 6 times |
 3. Pull a loop down through at the middle |
 4. Work it up tight like a Blood Knot |
This is a handy knot for making permanent or semi-permanent loops for hanging things from a kite line. It could have a ring for attaching clips for falconry, or you could hang, say, an emergency strobe from one. Prusik Knots tend to slip on thin kite line. For a possible alternative, see the note at the end of the Double Grinner Knot above.
Simpler knots, such as the Manharness Knot, are for thicker ropes, and weaken kite line more than the barrel-shaped knots.
For temporarily hanging objects from kite lines
This is a climbers' knot. Using a pre-tied loop of thin line, it can be used for attaching things to thicker kite lines (on thin lines it can slip). Put a ring or clip on the loop to attach things like falconry lures or lights.
 Pass one end of the loop several times around the main line and through the loop itself.
Note
Originally intended for climbing, the Prusik Knot is supposed to slip smoothly when loose and hold firm under a sideways load. To prevent slippage use an additional overhand knot in the loop to keep it from coming loose.
 This Prusik Knot was used during a falconry display to attach a small clip to my kite line for holding a falconry lure. The makeshift loop of too-thick, stiff cord tended to loosen after being tied, so I tied an overhand knot in the loop and snugged it up against the coils to act as a stopper. This worked fine.
There is a whole family of Prusik Knot variants. The Penberthy Knot or Caver's Helical Knot has three variations and opinions vary as to whether they should be wound upwards or downwards. They also have to be tied with the right amount of slack and the right number of turns for the job at hand.
Canadian mountaineer Bob Chisnall devised two more variations he calls Release Hitches to overcome the shortcomings of other Prusik-type knots. These knots are beyond the scope of this web page.
For attaching things with knobs, such as camera rigs, to kite lines
Also called Boatman's Knot, Builder's Knot and Peg Knot; in 1884 the knotting authority Burgess wrote of the Clove Hitch: "...made in the bight as if it was a single piece of line, this tie is often used by surgeons in cases of dislocation of the thumb."
Clove Hitches can be done quickly by making two loops side-by-side taken in opposite directions. First form one loop, then make another, flipping it around so that both loops are to the outside in relation to the main line. Then drop them over the knob together.
Some time ago I got this enquiry:
"Anybody know anything about the "Falconer's Knot?" If so, please contact: Dawn Smyth"
 This is the tie-with-one-hand knot used by falconers - it is not commonly found in knot books. Some kite-flying falconers use it to attach lure lines directly to kite lines, when tied in reverse so it can be yanked loose by falcons can yank it loose.
Here are some links to web-based resources:
- Download from The British Columbia Falconers Association (pictures 1 and 2 in this file appear to be switched - 1 should be 2, and vice-versa)
- Download the PDF file directly from here
- "Primitive Ways" e-mail answers to enquiries
 Here are the pictures from "Primitive Ways" in case it disappears in cyberspace.
The drawings at left may be a bit hard to see, but the instructions in the download from The British Columbia Falconers Association should help, although the photographs in that are also a bit hard to see.
 ©1998-2020 Dan Leigh, 54 Osborne Road, Pontypool, Gwent, Wales, UK NP4 6LX

